
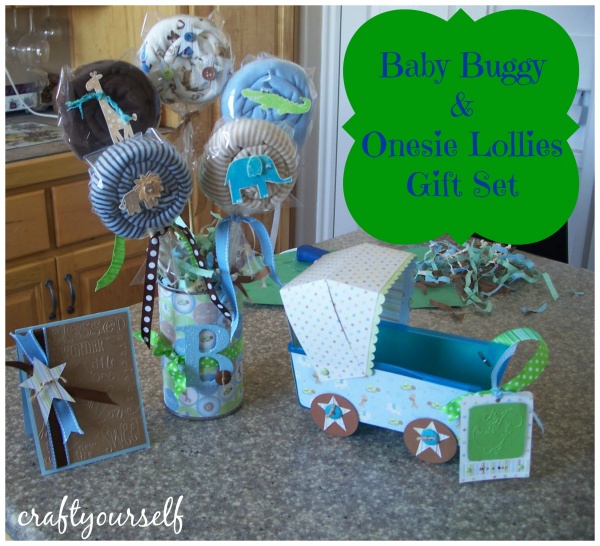
Baby Buggy & Onesie Lollies Gift Set
I was going through some old pictures and came across this Baby gift set I had made a few years back. A friend had paid me to make this set for a co-worker. I have made several sets similar to this one for baby showers and gifts. I realized how much fun it was to make these and personalized them to the mothers taste. Finding these pictures made me want to whip up another gift set, the sad part it I can’t think of anyone that is expecting right now! So, instead I have decided to share this with you and some instructions on how to make your own Baby Buggy Gift set. I wish I had more pictures to share with you of each step, but back in the day I wasn’t worried about tutorials! You will just have to read this to make your own.
Let’s start with the baby buggy. I purchase a drawer organizing set of 2 bins at the dollar store, I did make one of these a year or 2 ago and I couldn’t find these organizing bins like in this picture. Instead I purchased a bread pan that was at the dollar store also, it worked just as well. Lay the sides of your pan or bin on selected scrapbook paper, trace the sides of your bin and hand cut the pieces a touch smaller than what you traced. Glue all four hand cut pieces onto the sides of your pan or bin. I like to use tacky glue or a hot glue gun. For the wheels I used 4 pre-cut 2″ chip board circles, using a my 2″ circle paper punch I punched 4 circles out of cardstock and glued them to the plain chipboard. I cut four 1 1/2″ stars on my personal cutting machine and glued them in the center of the stars. I then embellished the stars with jute tied through a button that I hot glued in the center of the stars. Hot glue your four wheels onto the base of the pan/bin, I just eyeballed the spacing. To make the shade find cut a 12″ x 12″ sheet of cardstock to 12″ x 9″, score the side that is 12″ long at 4″ and then 8″ this should give you three 4″ sections. Then score the 9″ side at 2″ and then 4″. You will cut your 2″ and 4″ score lines on each side leaving the middle section intact. I hope you can tell what I am talking about by looking at the picture. You will have 2 small 2″ flaps on each side, then your will cut off the extra 5″ flaps on each side, leaving the center 5″ portion. I cut a scallop edge using my personal cutting machine. I used the scallop to embellish the shade. To attach this to the buggy Slide the back 2″ flap at an angle over the front 2″ flap You can tack these together with a dot of glue and trim any edges that aren’t matching up. Punch a hole in the corner of the bottom of the shade using a paper punch and attach a decorative brad in place. You can hot glue the shade in place or punch a hole using the crop-o-dile tool in the pan/bin and then attach the shade using the brad to hold it in place. I punched a hole and used the brad to secure the shade in place, next time around I will just hot glue it! Last step is adding the handle to the buggy! Pick out and cut a length of ribbon, you can attach it with hot glue of by punching holes in the bin/pan and securing with a brad. I usually fill the baby buggy with bath toys and wash clothes.
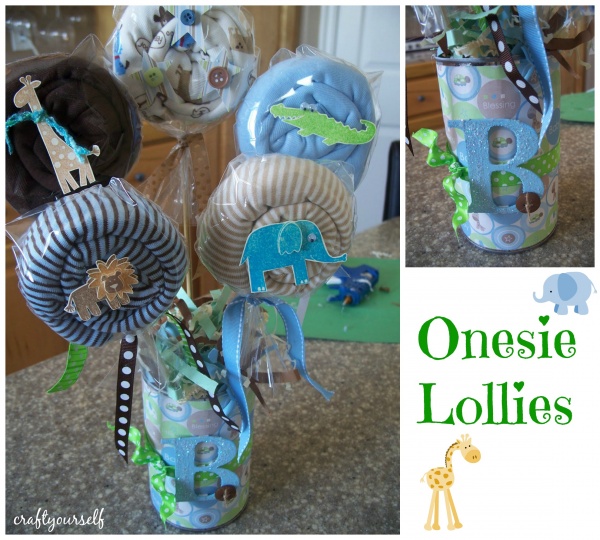
Re-create these Onesie Lollie’s! Purchase a pack of Onesies I did 5 but 3 onesies work just as well. Start off by rolling your onesies length wise into a long snake shape, use clear tape to help hold the onesie in this shape. Next roll the onesie in the opposite direction to create a circle or lollipop shape, continue using clear tape to help it hold the shape. Tape wooden skewer on the back of the rolled onesie’s. I Pulled clear party favor bags down over my onesie lollie’s and tied matching ribbons at the base, as if they were a lollipop. I stamped the animal images on cardstock and used doubled sided tape to adhere them to front of the lollie’s. To make the vase or holder, I saved an old soup can I hot glued a square of floral foam inside the can. I wrapped the can in cardstock to match the buggy, and embellished the can using ribbon and a large glittered chip board letter B for baby! Stick and arrange your onesie lollie’s in the floral foam inside the can, then place paper shreds over top to make it look finished! Hope you enjoy making this fun baby gift set!
You May Also Like
Striped Round Wood Halloween Wreath

Glitter cup tutorial.
