
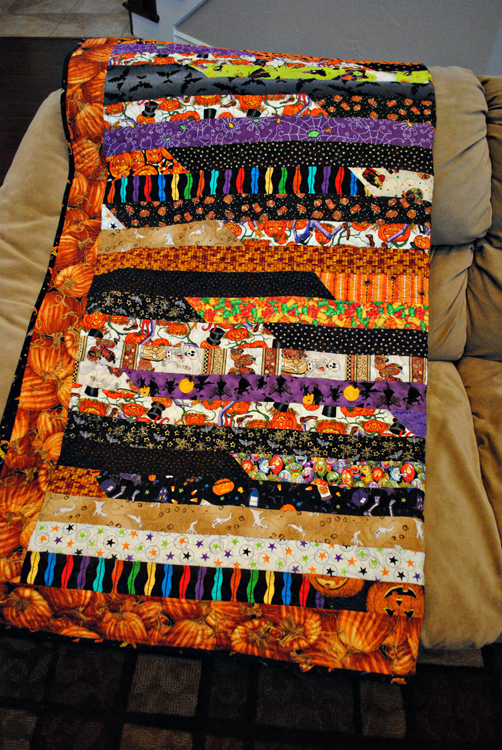
Directions for a Halloween Jelly Roll Quilt
My first quilt!!! I didn’t do it all myself but I did sew a lot more on this then any other thing I have ever sewn. My awesome mother picked up a stash of Halloween Jelly roll fabric at a quilt event of her’s for really cheap over a year ago. I love digging through my mother’s fabric and honestly when I was younger I absolutely hated going into any type of fabric store. I think my attitude is changing.
So Here it is TA DA!! My first quilt 🙂 (along with instructions)
What you will need in material:
Center: 17 – 2 2/2″ strips (jelly rolls work great)
Border: 1 Yard, Cut into 5 – 6 1/2″ Strips
Binding: 1/2 Yard
1. Sew each 2 1/2 ” strips end to end with a diagonal seam. Watch this closely as I (the amature) kept getting off on my sewing. NOTE- these 17 strips will make one continuous strip approximately 700″ long. Don’t worry about the placement of fabric as there is no way to judge which fabric will end up next to one another.
2. Trim seams to 1/4″ and press in one direction
3. Cut the first strip off approximately in the middle and discard the loos end. Trim the selvedge off the 17th strip.
4. Here is the hardest part of the whole quilt top. Bring the two ends together- right sides together without twisting the strip. Sew the long sides together (see picture) Your strip will now be 2 strips wide and about 350 ” long.

5. Clip the folded end so that you can open the strips and press the seam in one direction.
6. Again bring the short ends together, sew the long sides right sides together, clip the fold and press

7. Repeat step 6 until you have 16 strips sewn together. Notice that each fold cuts the strip length in half and the seam becomes much easier to sew
8. Your quilt top is now ready to be squared – up. Add a 6 1/2″ border strip to all sides. This will give you a finished quilt top approximately 45″ x 56″

Here is how the back side of the quilt turned out. Isn’t it darling!! 🙂 My mother also took it to the quilter and paid for it to be quilted for me.. I love my mom she spoils me!!


If you have any questions on how to make this quilt ask away!! I might not be able to answer them but I know my mom sure can!
Now on to my 9 patch quilt… that I started in June who knows maybe I’ll have it done in time for spring!


2 Comments
employment home work
Revenue to begin the web log, which was originally to Google Adsense, but step by step, as
the turnover rate in steps of a new moon and new funds to applications
for the website.
Pingback: