Floating Bookshelves
Floating Bookshelves
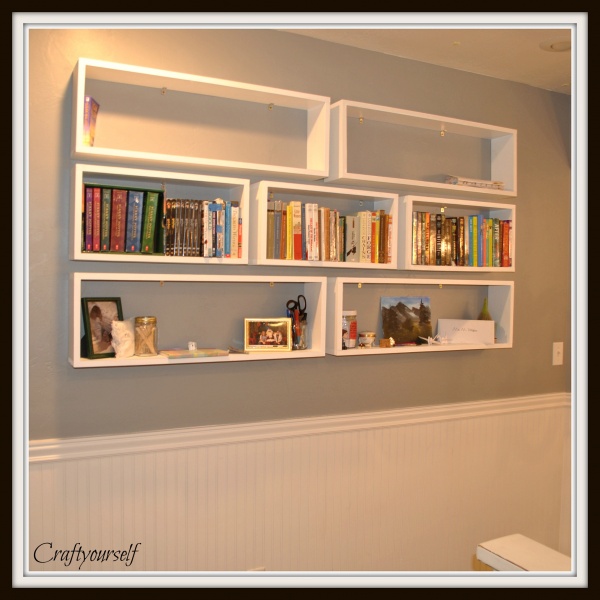
My daughter Maeli kept telling me she wanted some sort of bookshelf in her bedroom. Because of her bead board and wainscoting on her walls I couldn’t do a full length bookshelf without it being a separate component. Her bedroom is the smallest bedroom in the house so we also wanted to keep as much floor space as possible.
There are some photos on the internet of floating bookshelves but couldn’t find a plan on how to make them. So I chatted with my husband and we came up with our own creation. He first went and bought some 6″ wide pine and measured out the wall space of how much room we had to work with.
I knew I wanted to keep all the boxed bookshelves in a rectangle but have them as individual boxes on the wall. I also knew I didn’t just want a floating shelf as she would have to use book ends. So between hubby and I we decided on doing 6 boxes total. 4 the same size then 3 smaller ones. The 4 larger boxes measure approximately.: 35″ wide & 10.67″ tall and the 3 smaller boxes measure approximately: 22.67″ wide by 10.67″ tall. Now I know those are weird dimensions but he had to allow for 2″ in between each box once hung on the wall. So they wouldn’t take up a lot of space into the room the depth of them is only 6″ (Perfect for a book to lay flush inside of them)
So no holes would be visible when nailing these together we used the Kreg jig. We then filled the holes with wood filler before painting. If you make these make sure you sand them down. Plus don’t forget to dust them off before applying paint. Maeli’s bed is white and so is the bead board in her room so the boxes were painted white to match. The painting portion of this project took quite a while. The boxes themselves were whipped up in an afternoon but the painting process took several days and several coats of paint.
Once all the shelves were hung on the wall the overall dimensions came out to be 6 feet wide and 3 feet tall. So these shelves took up a good portion of her wall. (don’t you also love the records she decorates with?) I love her fun style!

I think in both her mind and my mind all her books would take up all the space on these shelves. Luckily she has a bunch of room left over. Although, she is determined to fill them. Update!! 2018 – It only took 18 months to completely fill these floating bookshelves. She is now requesting more!




8 Comments
Michael
How did you hang them on the wall? I want to do Thames for my daughters room.
Thank you!
Michael
Avry
shelf brackets found at Home Depot or Lowe’s.
April
I have been all over the Lowe’s and Home Depot websites trying to find a bracket that looks like what I think you used. Would you be willing to post a link to the item (or a similar one)? I was wondering if I might be able to build these with 1x8s, but don’t want to buy wood until I know if the bracket will be able to support it. Thanks!
Avry
It’s been so long I would need to back and look at the bracket 🙂
Gordon Nicol
Hi Avry,
Really love these shelves and I want to make some for my 3 year old daughter.
Did you really ONLY use these small two brackets for each box?
I want to put quite a few books (not too heavy) on the shelves and so, want to be sure these small brackets would be enough.
And were they just at the top or are they at the bottom too? It’s not easy to tell from the photo.
Thanks so much for your reply. Really appreciated.
Gordon Nicol
Avry
Brackets are just on the top. All bookshelves are full of books now and I should take an after picture! Make sure the brackets are screwed into a stud and you won’t have any problems! If they aren’t screwed into a stud then yes you would have problems.
Avry
Just brackets on the top. Make sure that they are drilled into a stud. These shelves have been hanging for years and they are all 100% full now. Those bookshelves aren’t moving 😉
Lillian
I also want to do this in my bedroom but need to know what you used to hang them. Awesome job and thanks for sharing