
How to refinish a hutch
While scouring the local classifieds I found this hutch for only $25.00. Since I was at work I sent my husband to pick it up for me. Upon arriving at the home of the hutch owner and inspecting the hutch my husband called me. He literally tried to convince me out of getting it. You will see from the following pictures as to why.
It was in a smoker’s home at some point and smelled of old stale smoke. The hutch was broken on one edge, missing a knob & missing one of the glass shelves inside. Yet I still wanted it.
Here are some before pictures.

I began scrubbing it down and taking it apart almost as soon as I got it into my garage. Mainly because I couldn’t handle the smell. The rag and water I was using to clean it with was covered in that yellow / brown nicotine residue. I scrubbed and scrubbed. I removed all of the glass and the hardware from the hutch.
Here you can see the corner of the hutch that was broken off, also see how dirty this was!! UGH!!

My husband cut the broken edge off all the way around the base of the hutch part including the front, back and sides. He then bought a new 1″ trim piece at home depot and cut it to size. Once the new trim was in place we went to town with priming the hutch. I used a primer that cuts out stains and the smell of smoke. I covered it with one coat then let it dry overnight. The next day I covered it again with another coat of primer. During this time my husband also caulked any parts of the hutch that had gaps or cracks that were showing. He also put in a few nails along the base to pull the bottom trim in closer as it had pulled apart during the move.
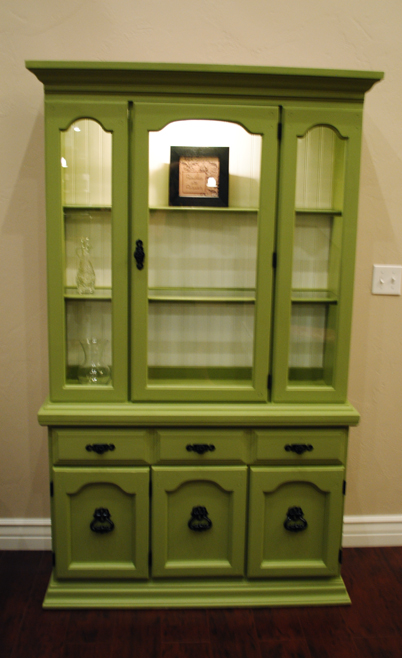
I had him pull the ugly backing off of the hutch and replace it with bead board but before he put the bead board on the back I left it open to have easier access to the inside of the hutch. I wanted a little contrast so I left the back beadboard piece white. I wanted to make sure it was painted well. I did probably 3 coats overall of the final paint. I picked out the color Prairie brush from the Valspar paint line. I love love the color!
If you look close enough at the left hand corner and across the front you can see the new trim that we put on.

Here is an up close picture of the hardware and pretty accurate on the color. Some of the pictures make it look brighter then it really is.

I took the pictures in different lighting. So the color can be decieving. I painted the original handles black and found a replacement knob off of an old desk that I had refinished. My husband took the one glass shelf that the hutch came with and had a second one cut at hobby lobby to replace the missing one. They ended up giving it to him for free because it was from a broken frame that they had.

I had a lot of fun refinishing this piece. I was able to personalize it and add some color to my living room!
Now I just need to figure out what I am going to put inside of it!! So many possibilities!

18 Comments
Tiff
Wow. Wow. Wow. I think that is my favorite project you have done. LOVE how it turned out!!!
Sara B
I love, love, love this! I need to do one for my kitchen because I have no cupboard space. Did you have to sand it at all before putting the primer on?
Avry
I did zero sanding.
Kristin
Love this project! What a dramatic change!
I really have been itching to paint my grandmother’s butch. Did you sand it at all first? and if not, is it holding up well?
Avry
I never sanded it before priming.. and it still looks just as good today 3 1/2 years later as it did the day I did it.
Avrycrafts
I did not sand what so ever. There was really no need to on this piece 🙂 hope that helps.
Jeralee
Love it! Thank Heavens for Justin and his patience, handyman skills. I think he needs to build you a little workshop on your RV pad to the side of the garage. Sooo… sell it! make some good moolah. There will be plenty of other 70’s ugly, tacky hutches to make beautiful again.
Kim
That came out great. The light inside is really nice to show off the contrast. And fixing the trim was genius!
Jennifer
Great job! Love the color and use of beadboard! And the price isn’t so bad either! 🙂 You revived it for sure!
Beth
China cabinets are my favorite furniture to restore. I just finished one in red. I love what you did and I am a big fan of the green and the inside treatment, Great Job!
Michaela
What a fun color! Great work!
Nicole
It looks beautiful! What did you use to secure the breadboard on the back?
Avry
We used our nail gun along the edges and did Brad nails into the back edges of the hutch
Teresa
i am refinishing an almost identical hutch. Can you tell me if you painted it with a brush or spray painted it?
Avry
I did it all with a brush and roller.
CJ Getty
Did you brush on the primer as well?
Avry
Yes I did 🙂
Pingback: